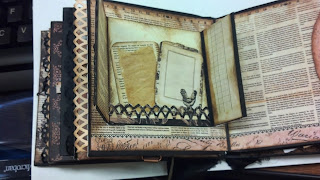
Below is a mini album I created using five #10 envelopes. Love the way it came out. It is only about 4"x 4 1/4, but has lots of real estate for pictures.
The paper I used was a Prima 6"x6" stack. It was actually some leftover paper from a smaller mini I had done. I was trying to use it all up and I did. Only thing left is some really small scraps and a couple of tags from the paper and I will probably add that just to get rid of it and to not have to throw it away. I kept the embellishments to a minimun so that I could focus on the paper. The roses are both from Prima, as is the pearl bling. The frame is something I have had forever and have no idea where it came from, maybe the dollar store, the black on the edge is some ribbon roses that you get by the yard at Hobby Lobby. The hard plastic roses came with the pearls.
Haven't done anything with the inside cover, but feel I need to do something, that is probably where some of the left over tags will go. The right side is a mat and a half. I used two different Martha Stewart punches to dress up the edges of the mats.
This is still page one, The tab thing in middle of the page actually lifts up and the tags come out. The flap just fits inside a slot at the bottom of the page. Love how the band looks like a cigar band. I had to do a lot of piecing together, since I was using left over paper.
Pages 2 & 3. Kept them pretty simple, both pages have double mat for a photo. And all pages have a pull out mat. You may not be able to tell from the picture, but page 2 is actually larger than page 3. On the larger pages I used a black photo mat, and on the smaller pages I used the peach photo mat with a different edged puch.
Pages 4&5. Pretty simply, a little of piecing to be able to cover the pages. The flap is magnetized and hides a photo mat. The brackets are fussy cut from the paper. I have had those round paper clips for a long time and decided I need to start using what I already have.
Page 6&7. There is a band across the photo mat, which allows a picture to slip behind it. There is also another photo mat behind the peach mat. Page 6 is the photo mat and a half..
This is the page 7 photo mat and a half folded out. There is one of those small Paper Studio paper bags there, mostly hidden by the matting, but it also has a photo mat inside. I like how the angled pocket came out on page 6. Added a couple of fussy cuts and glossed them up.
Pages 8 & 9. Page 8 is accordian folded. Page 9 is large pocket to hold another photo mat, along with fussy cut butterfly with only its body attached to paper.
Not a great picture of the accordian fold, but it will basically hold 9 pictures.
Page 10&11. Kept it simple, but the left side has a kind of gate fold feature.
A picture of the gatefold opened up.
Pge 12 & 13. Started running out of paper, so used some black paper and embossed it. Attached corners will allow for a large matted picture to be placed on these two pages.
Page 13, the mat and a half. Simple, but love how it came out. Just glued the top and bottom of a piece of scrap and placed it over some of the embossed paper and stuck a couple of tags behind it.
Page 14 & 15. Pocket on page 14 and a photo mat on page 15.
Page 16&17. Kept it simple. Used some of the leftover pearls to go around the mat on p17. A little fussy cut on page 16.
Page 18. A waterfall.
The waterfall is magnetized. Ended up using two sets of magnet, one near the top and one near the bottom, so it would lay flat.
As I mentioned earlier, there is a lot of real estate in this mini. Now I need to print some pictures for it.


I love your style, thank you for sharing.
ReplyDeleteThank you. I love mini albums they seem easier to decorate than scrapbook pages, but I have to get back to pages because my kids graduate and I want to finish their school years.
Delete